
Hi everyone! Today I am joining the Lana Blog Tour with a woven version! Keep reading to know all the mods I made to turn this pattern designed for knits into a fabulous woven top.
This is the second time I use this pattern, you can see my first Lana, in knit, here (my testing version, I was one of the pattern testers before the pattern was released). If you are a usual reader of this blog you know I love to try new patterns and new indie pattern designers, and that it is not usual for me to make a pattern twice. So when it happens you know it has got to be a really good one! (This doesn't mean that I only repeat patterns that are really good ones, because there are a lot of these around! It only means that *if and when* I use a pattern more than once you can be sure it is a high quality one. :) ).


Pattern:
Lana Kids Top & Dress by Coffee and Thread.
There is also a women's version if you're looking into mommy-and-me looks!
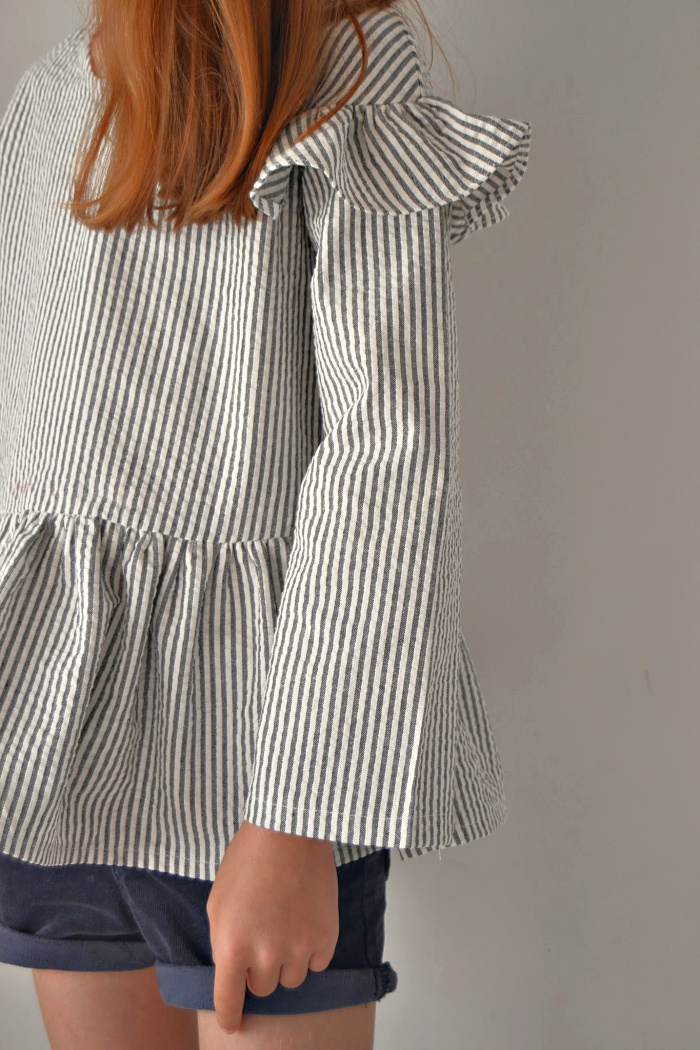
Fabric:
Midweight seersucker from a local fabric shop (Mike Tecidos).
Pattern details & modifications:
All info (size range, options, etc.) of this pattern can be found in THIS blog post (with my first Lana).
So, here is all the mods I made to turn this pattern designed for knits into a woven top! I am sure there are other ways of doing this, different techniques that can be used, so this is not by all means a tutorial on "how to make a woven version of the Lana top". :) I have already asked Olga to make a woven version of this top and I am sure *if* she ever does it (designers always have such a long queue of ideas and patterns to make, right?) she will use all the good techniques.
- Size:
I picked two sizes up. Usually you just go up one size when going from knit to woven, but I wanted to make sure this would fit her and would last a bit. I think I had the right call because I really like how it fits her.
- Closure:
- Because this is a non-stretch fabric I had to add some sort of closure. I first thought about adding a zipper to the back but I have opted for a more simple option: a simple slit and a button.
- For that I have cut the back piece in two parts and not on the fold. I added seam allowance to both parts (3/8'') and sew them up until the desired slit length.
- Then I thought about making a lining or even a facing for the neckline + slit, but again I decided to go for the simple path. :) (Yeah, you can call me lazy or...bear in mind that with 5 kids, one of them is a 6 month old baby and other is a very active 2 year old that keep me in my toes, I have very little time to sew and so I often have to go for the simple & quick methods... ahaha) So, I have just folded twice the S.A. (of the slit and all the way to the bottom of the back) and topstitched it. See, not the best technique if you prefer not to have visible topstitching but it totally works and looks nice.

- Neckline:
The neckline was finished with a bias facing (I used pre-made bias tape). I first stitched the bias to the top with main sides together, than turned the bias tape to the inside, folded twice and hand stitched it because I am not a huge fan of topstitching at the neckline. So, I don't always go for the simple & quick, haha! It's only when it still looks good and doesn't make a really lousy result. :)
After the top was almost done it hit me that I should have adjusted the neckline line since it wouldn't have the ribbing piece... Oh well, it doesn't look that bad doesn't it? :)

- Sleeves:
Because this is a non-stretch fabric the sleeves had to be made roomier (or I had to add a placket, which was not the simple path, haha). I have just traced a straight line from both bottom tips of the armscye curve all the way to the bottom of the sleeve (at the wrist level). Then it was simply hemmed. I think it would also look cute with an elastic case, for a puffy sleeve, and this was actually my first idea.
- Gathered piece:
I have used the gathered skirt piece of the dress version. I think I used about a little less than half of the length.

And, I think this is it! If you have any questions just let me know. Again, this is not intended to be a tutorial just a quick (or not so quick, haha!) note on how I did it. And this won't work for the women's version, because there are bust darts that need to be added for a perfect fit.
You really, really, really should go check all the a.m.a.z.i.n.g kids' and women versions that were done for this tour. Grab a cup and sit back! (These are their Instagram handles.)
Nov 5 | @replicatethendeviate @stofaholic @e_shimokawa
Nov 6 | @fairiesbubblesco @becky.a.petty @nf_merritts
Nov 7 | @bydaggbjort @martadoguincho @__little____
Nov 8 | @kaleidothought @circlemeetsline @springatet
Nov 9 | @sisforsewing @alexiasotelo @sewlahteadough
Nov 12 | @jenyathommo @sewitcurly @e_shimokawa @ftmom3
Nov 13 | @Littlecumquat @incompletestitches @madebylarth @angie.burgett
Nov 14 | @mypetitesophie @zoe.van.den.heuvel @by_mooglii @withlovebyeva
Nov 15 | @SewSophieLynn @enjoyful_makes @heidi_handmadefrenzy
Nov 16 | @frl.love @idlesunshine @_beletoile_ @liiviundliivi @made.by.sara.blog
Happy sewing!


I love it! I am so happy it worked out! It’s beautiful! Ans the closure is totally the way to do! Nobody has the time for fancy closures! 😉 Well done, mama! ❤️❤️❤️
ReplyDelete